Tuesday, April 2, 2019

MacDuff Counter Attacks


The scenario I chose to play was "Counterattack" from Thomas' One Hour Wargames. The rules were the updated version of With MacDuff to the Frontier. Prince August's series of homecasting moulds  provided the armies.
The Nordmark Naval Regiment stands alone.
The scenario gives "Red"(Maritime Alliance) 1 unit to hold the bridge with 5 more units arriving on turn 3. "Blue" (Rosmark) has 6 units on his baseline. Unknown to Blue (Theoretically - this is where Solo play often requires a bit  of dual personality or at least roleplay.) there are 2 fords, one near each board edge. The winner is the side that holds both bridge and town at the end.

Rather than roll on the 6 unit chart, I prefer to roll twice on the 3 unit chart. That way, there is at least a chance of having an all arms force.

In the event, Blue rolled up 3 infantry, 2 cavalry, and 1 gun while Red rolled up 3 infantry, 1 light infantry, 1 cavalry and 1 gun.

After what felt like an eternity of artillery bombardment, cavalry charges and musket volleys, the Nordmark Naval Regiment was relieved to see the rest of the Alliance forces arrive.
For the last few years MacDuff has offered a choice of activation methods. The new one that works best for straightforward battles is a simple initiative card draw or die roll to see who goes first each turn. The original one which was designed for the confused situations found in frontier skirmishes involved card activation by single units or groups of units under a commander.  I opted for the latter.

The battered Naval Regiment has pulled back into reserve while the Alliance cavalry has met a Rossish cavalry charge and smashed it.

The main thing I wanted to do was to test my newest attempt to get my rally rules working smoothly. The rally rule has caused me  the most problems over the years while also doing exactly what I wanted it to do. At its most basic, the idea back in 1995 was that  not all "hits" were dead and wounded but included all those things that lower a unit's efficiency from men who have frozen up or been temporarily stunned, to disorder and confusion in the ranks to temporary ammo shortages  and so on. Therefore I allowed units to try to recover casualties when the unit rallied. I got a lot of push back from people who could only see wargame casualties as dead and wounded  but that wasn't the problem.

The problem was twofold. One issue was the logistics of tracking an increasing trail of bodies while waiting for a unit to rally and needing to differentiate between those who failed their rally and were out of the game and those who were still waiting for their chance. The second, more important issue, was that successful rally rolls prolonged the game, 5 hours was not unusual for larger games but having to make a decision about who won when time ran out was even more common.


After some fierce fighting the Rosmark forces have been flanked and driven back with heavy losses.
I won't bother trying to list all of the ways I tried to resolve the issues to my satisfaction but eventually I almost gave up altogether. Having a rally phase at the end of each turn simplified the logistics and rolling once for each pair of 'casualties' kept the recover rate reasonable but since rallying and reforming the ranks were tied together in my mind this meant that disorder was almost meaningless as  it was often removed before the enemy could take advantage and almost always removed before it affected the unit's own actions.
An attack by the Rossish reserve regiment has driven the Alliance cavalry back over the ford but Rosmark has taken many more casualties and half of their units have been driven from the field.

Recently, an obvious solution finally occurred to me. All I had to do was separate "reforming", which is an action which is done instead of shooting or moving, from "rallying" which has to do with morale and losses and can be done at the end of each turn and can be at the end of a turn without taking much away from the game.

The Garrison of Smalltown make a brave stand to give the army a chance to escape.

This was the first MacDuff game using the new approach though I used it successfully last week in my non-MacDuff 54mm game. It worked again in this game.  Its not perfect, and sometimes the end of turn rally seems little different from a traditional saving throw made immediately when the hits are taken but if a unit takes hits early in a turn, the difference can be critical  and from a purely "game mechanic" perspective, it works and is close enough to the original idea for me.

Op Compass - Game 4, Last Stand


Our trip through the actions at the beginning of WW2 in the Western Desert continue this week with our 4th adventure in the sands of North Africa.

If you want more information on the Campaign I have set up a separate page which is updated regularly with updates on rules along with links to all the previous games,

 https://yarkshiregamer.blogspot.co.uk/2018/04/opcompass-1940-resource-page.html

The games are based on an excellent book by Robert Avery which is available from The Toofatlardies, there is a direct link to purchase the book on the Resource Page.

We use 28mm figures with this scenario taking place on an 8 x 6 table using a home brew set of rules, based on Iron Ivans Disposable Hero's.


Matildas lead the charge (ok walk) into the Fort

Historical Background

It's the 9th of December 1940, the Italian advance into Egypt has stopped, the forces of Mussolini happy with the ground taken have started to consolidate and form a series of forts across the area.

The British Commander General Wavell decided that the next move of the war would be a British counter attack. Part of the plan involved the 4th Indian Division (consisting of British and Indian Infantry) supported by the heavy Matildas of 7RTR passing through a gap in the Italian lines and then turning North towards the sea attacking and neutralising forts along the way.

Our game represents the final stand of a group of Italian Troops in the Fort of Nibeiwa.


Table Set Up and Terrain

The above photo shows the table before any troops have been added, I have just used 8 x 6 of our table. As described in the briefings below this represents one corner of the Fort. There are three trenches and a series of low buildings to represent huts and buildings. In addition to that there is a large open walled area along with some tents to the bottom of that.

The roads and tracks give no bonus to movement, they are just well trodden paths within the Fort area. There are no special rules in force.


Turn 2 and Mole breaks down, it didn't move again until the last turn of the game
British Briefing and OOB

As British Commander you have the simple job of cleaning up the last defenders of Nibeiwa, the majority of the Fort has been subdued however the last pockets of resistance are holding out in one corner of the base.

Minimise your casualties as there is plenty more work to be done today, your forces for the attack are listed below,


Italian Defenders under artillery fire.
Force Commander - 1 Officer, 1 Sgt and 1 Radioman in Truck
Artillery Observer in Daimler Dingo
7th RTR Troop - 3 x Matilda 2 tanks
1 x 25pdr (Off table)

Bren Gun Carrier team with 1 vehicle carrying 1 x Vickers HMG and crew, other two with standard 1 x Bren or 1 x Boyes AT.

Bren Gun Section (HQ is force commander)
1 x Support Section with 1 x 2" Mortar and 1 x Boyes AT Rifle
3 x Infantry Sections with 1 x Sgt with SMG, 2 man Bren Team and 7 Rifles

Truck Borne Section (as Brens) but 1 truck with HQ and Supports with 3 further trucks each with an Infantry Sections.

Morale, Basic 5, Corporal 7, Sgt 9, Officer 11

British Forces arrive at the top of the table (defined by the set up photo) the Matildas move on in move 1, the British may bring 2 sections or supports per turn. Artillery is available when the Artillery Observer is on table.

Reinforcements may be available on request.


British HMG lays down support fire from a rooftop
Italian Briefing and OOB

Things are not going well, the British attacked Nibeiwa early this morning and so far they have captured most of the Fort, you are our last, best hope. Protect the radio room at all costs and hope that they can raise the required reinforcements before you get over run.

Your forces are as follows,

Force Command  - 1 x Officer and 1 x Radio Operator with 1 additional Radio Operator.

1 x L3 Tankette
2 x 75mm Field Gun and crew 
1 x HMG and crew
1 x 81mm Mortar 
1 x 47mm ATG

4 x Italian Squads each with 1 x Sgt with SMG, 1 x Corporal with Rifle,  1 x 2 man LMG team and 6 Rifles.


Italian Artillery in action
Morale Basic 4, Corp 6, Sgt 7, Artillery 8, Officer 9

All Italian Units are hidden and only placed on table if they are spotted or fire. The Italians secretly chose one of their buildings as their Radio Room and place their additional Radio Operator in that structure.

Umpire Notes 

Other than the hidden Italian deployment this is a fairly straightforward scenario, the British are expected to over run the Fort and for me unless they loose next to nothing a winning draw should be the best result they could expect. The Italians earn a draw if they cause a reasonable number of British casualties, a winning draw if they cause enough damage for the British to call for reinforcements (there aren't any !) and a win if they can hold the British off.

The game should last one full gaming day, call the result at the end of your gaming day.


Bren Carriers to the front.
How did we get on.

Another fun game, initially the Italian players, their morale dented by the last games drubbing, were quite resigned to being quickly over run but soon realised that the game was going to be a much closer affair, they chose quite a deep defence, leaving the buildings at the top of the table, instead choosing to defend the walled area and the trenches, the latter having the best fields of fire.


Looking cool, but still broken down.
The first significant action took place fairly quickly, a Vehicle Breakdown card was drawn as an event and the last vehicle to move was the Matilda called "Toad", dice rolled, a serious engine problem, cue much frustration as it took the whole game to fix !


Hide and Seek
Taken out by a Bren, embarrassing !
The "tank" battle was quite amusing, the faster but frankly useless (vs another tank) L3 Tankette, spent most of the game using it's greater speed to hide from the two remaining Matildas, hiding behind building after building with the British Infantry Tank plodding behind, this worked fine until it got bogged down in sand and shot up from the rear, quite embarrassingly by a Bren Gun.

Bren Attack !

Dismount and Charge

Run Away !
The Infantry fighting in the buildings and around the walled area was fierce, close range firefights and hand to hand combat was the order of the day. The British Infantry slowly capturing a building at a time with the Italian Infantry giving a fine account of themselves.

One Italian Artillery unit in trouble

2nd one in more trouble.
The Italian Commander had set up their two Artillery units fairly far forward in the shadow of the walled area and in the early part of the game they gave some excellent support to the front line, however both were to fall. The first Gun lost a figure to a stray round but was finished off from the machine gun on a Matilda.
The second gun was caught by a section of British Infantry, they had just cleared the walled area and ended up streaming out of the gated entrance into the Italian Artillery men, they put up a fight but there was only going to be one winner.


"I keep hitting it Sarge, it ain't doing no good"

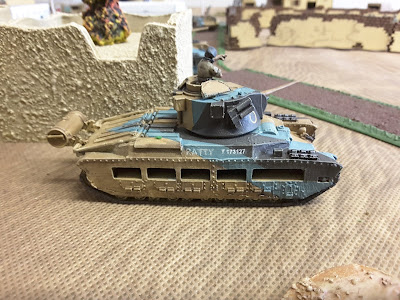
"Ratty" proving invincible again
The Italian player fired AT after AT round into the remaining 2 Matildas but to no avail, there is a slim chance of causing some track damage with a 47mm against these beasts but rounds just kept hitting and bouncing off the hull, turret and mantle.

The last stand
The final group of Italian Infantry held out for a couple of turns in the last trench, supported by a Mortar and a HMG, but the British had ended all Italian resistance bar a AT gun and the HMG and more importantly the Radio Operator who was still busy calling for reinforcements oblivious of the carnage going on around him.

Final losses where as follows,

British - 16 Infantry and 1 Bren Carrier
Italian - 32 Infantry, 8 Artillery crew, two guns and one Tankette.

Italian Commander minding his own business when a 25pdr lands next to him.
A tough one to call, result wise and I did give a winning draw to the British on the day however on revision I think the Italians did much better than they did historically and caused a decent number of casualties, plus they put up a damn fine fight, so I have revised the result to a draw.

The draw gives 2 points each giving us a running total, after 4 games as British 11 points and 5 points to the Italians.

Game 5 coming up soon when the British will be trying to push deeper into the Italian Forts.


Monday, April 1, 2019

Growing Up With Shonen Jump


They say that every generation has a magazine that defines them: Mad, Fangoria, Playboy, National Lampoon, Rolling Stone, Nintendo Power. At the time, such magazines were just another exciting and informative distraction to look forward to, but looking back, you realize how much they shaped the thoughts and dreams of your youth. For me, whose fondest memories were defined by Dragon Ball after school, Yu-Gi-Oh duels on the weekends, and sneaking Bleach manga in-between classes, that magazine was Shonen Jump.


Now, just to clarify, when I say, Shonen Jump, I don't speak of the original Japanese weekly that's been in publication since 1968, but of the monthly American adaptation that launched in 2002 and ended in 2012. For many kids born in the early 90's our gateway into the world of anime was through the Saturday morning cartoon line-up: Pokemon, Digimon, and a little later, Yu-Gi-Oh, as well the evenings on Cartoon Network with Dragon Ball Z, Yu Yu Hakusho, and Rurouni Kenshin. Out of all of these stories, only Yu-Gi-Oh kept a sustained hold on me, due to my interest in the trading card game, and many exclusive rare cards were included with Jump magazine. My very first copy of Jump included the Trap Card "Embodiment of Aphosis", which was later stolen, but I at least still had the magazine to read, and what a magazine it was.


Initially, my brothers and I only begged our parents to buy Jump to get the next rare card. We were like aficionados of Playboy who saw only the centerfold, but once the shock of a naked woman fades, you start to read the articles. I naturally only read the Yu-Gi-Oh manga, which told a more uncut story than the sanitized version we got from 4Kids, but from there, I began to read some of the other manga that also had appearances on 4Kids, like One Piece and Shaman King. Then when Naruto and Bleach went on Cartoon Network, I found myself searching past Jump issues for any missed chapters. I read so much Jump in those days, that nearly all of my early manga purchases were based on what I read in the magazine. I even pushed myself to read stranger manga like D-Gray Man, Black Cat, Gin-Tama, and Claymore, based on their Jump debut specials. Not to mention Death Note, which while being very dark for my age, was still extremely popular for debates around the middle school playground.

While Jump did a rather short run in print, I think that the impact it had on the otaku community is not to be understated. Drawing them in with trading cards and the hottest anime, Jump introduced a new generation of otaku to manga, one of Japan's highest literary arts. Manga translations, of course, existed before Jump's launch, but they could be a hard sell, especially to young people. They were black and white, not splashing with color like American comics, and had to be read from right-to-left, as opposed to left-to-right. Of course, the strength of a manga belongs to the artist alone, but Jump was a cheap way for curious readers to take a dip into the pool. This popularity was also helped by the fact that the magazine printed one of the most accessible genres in manga, one which had palpable parallels to the superhero comics of Marvel and DC. Jump came right at the perfect time, when young otaku were starting to grow out of Pokemon and Digimon, and in need of stories more mature and action-packed. The time was ripe for shonen's "The Big Three": Naruto, One Piece, and Bleach, to take command of the anime scene, which in turn reverberated to sales of their respective manga. Millions of volumes were sold. Jump was the lifeline that kept many of us in the world of anime and manga through our adolescence, and our springboard into more diverse and challenging stories.


Of course, every thick issue of Jump didn't thrive on manga alone. The front covers were always exciting and colorful, commonly with an image of Goku, Yugi, or Naruto. The introductory and ending color pages had the latest news on upcoming manga, anime, and merchandise. There were exclusive interviews with creators and fans, and a small Japanese vocabulary lesson each issue. There were also useful tips and strategies included with each rare card, and articles exploring the themes of particular manga, my favorite was their commemorative issue on Dragon Ball. Yet with the rise of online manga translations, it only seemed inevitable that Jump, like so many other magazines, would also have to go digital. This was probably their smartest decision business-wise, but it's also a sad thing. There was something about the freshly printed paper, flipping through the new manga, and claiming that shiny new card which doesn't quite translate in today's digital world. It was an exciting ride, however brief, and I never forgot one thing: that true ninja, true soul reapers, true pirates, true duelists, true spirit detectives, true shamans, true rurouni, and true super saiyans always read manga from right to left.